Protocols and Sample Preparation
What to bring
- Your filtered cells
- Extra media/buffer
- Tubes to sort into with your media in the tubes (or whatever buffer you want your sorted cells to land in)
- If using the cloning sort option, your 96 well plates with media in each well
- A sample of unstained cells, pos &/or neg controls, and compensation (single color) controls for each stain
IMPORTANT! BIOHAZARD PRECAUTION!
Due to the fact that cell sorting generates aerosols and the cells are generally not submitted in any fixative, the biohazard risks are much greater than in analytic flow cytometry done on a machine without a jet-in-air flow nozzle. It is therefore imperative to discuss any biohazard issues with Leslie before setting up your experiment. At CSU, we do have an aerosol evacuation system which removes micro droplets and particulates greater than 0.12 micron. They are removed under vacuum, and trapped in an Ultra Low Penetration Air (ULPA) filter. Please inform Leslie of the Biological Safety Level (BSL) of your sample.
Sample Preparation
As a general requirement, all samples should be prepared in a single-cell suspension form at a concentration of 6-8 million per ml to 10-20 million/ml (depending on cell type), after all labeling and filtration steps, or in a volume of 500 µl if only low cell numbers are available. DNA analysis requires fewer cells/mL. Immediately before it’s brought for sorting, samples should be filtered through a 35-50 micron filter to remove any clumps or aggregates prior to analysis. This will ensure the removal of any larger clumps before the sample is introduced into the cell sorter. If this is not performed, and your sample does contain clumps, it can clog the flow cell, which will cause a considerable delay in the sorting of your sample as that clog would need to be removed, and the machine re-calibrated.
There is an excellent link on the UCLA Flow Cytometry web site with procedures for numerous flow cytometry protocols. Contact Leslie Armstrong-Lea for additional protocols for flow cytometric analysis or sorting.
Controls
Appropriate control samples must be included in all experiments. The control could include:
- A sample of unstained cells
- Positive and negative controls
- Compensation (single color) controls for each stain as cells or compensation beads
To further understand fluorescent compensation, read this tuturial by Mario Roedererd.
For surface staining of cells; usually three controls are needed for each experiment. The controls must undergo the same treatment (i.e., preparation) as all the tubes in an experiment. An unstained control is used to detect auto-fluorescence or background staining innate to the cells of interest. Auto-fluorescence can be a significant problem, particularly in systems that contain monocytes/macrophages, cultured cells, or activated cells. An isotype control (i.e., where an antibody is used that has the same immunoglobulin isotype as the test antibody, but a different specificity which is known to be irrelevant to the sample being analyzed) is needed to determine whether fluorescence emitted is due to non-specific binding of the fluorescent antibody. A positive control is highly desirable (although not always available) to prove that the test antibody and/or procedure is working properly. The positive control should include cells known to be positive for the marker of interest.
If more than one color (fluorescent conjugate) will be used within the same experiment, a single-color control must be prepared for each of the dyes used. This will allow for compensation from spectral overlap between the stains. An unstained control is also important for multi-color compensation. In any experiment where two or more fluorochromes (multi-color analysis) are used to characterize the cells of interest, the need for fluorescence compensation must be checked. Fluorescence compensation is the mathematical subtraction of the fluorescence of one fluorochrome from the fluorescence of another fluorochrome. This is necessary because emission spectra from multiple fluorochromes can overlap. For this reason, in a sample that contains 2 colors such as fluorescein isothyocyanate and phycoerythrin, fluorescence due to the FITC will be detected by the electronics that are set up to detect fluorescence produced by the phycoerythrin. If this were not subtracted from the phycoerythrin fluorescence, the phycoerythrin signal would be falsely elevated. To determine the correct amount of fluorescence compensation, cells stained with only one fluorochrome-conjugated antibody are analyzed individually. This must be done for each of the fluorochromes used in the experiment, with an unstained control as the initial region.
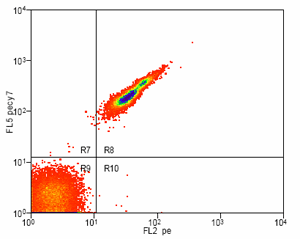
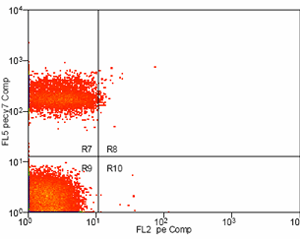
Example: Antibody Capture Beads Stained for PE-CY7 before and after compensation
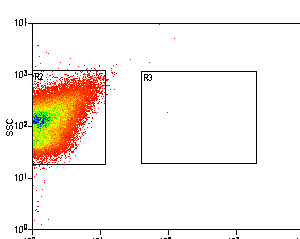
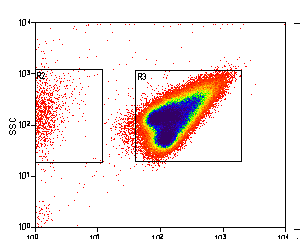
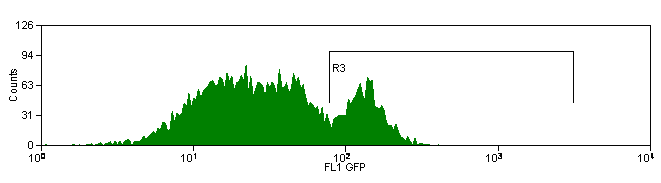
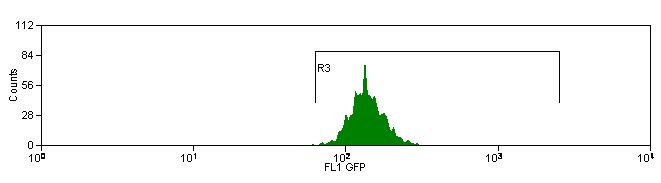
Example: Bacteria Unstained Control and 95% Positive Control
